Application to Control Led Matrix Panel with Android Phone - Part 1
We continue our control applications with Android phone. We will describe this application in three stages (three articles). First, in this article, we will try to explain how to program with the Flutter-Dart programming language.
On our website, we have made similar applications before. Example; Such as DC Motor control, Led control. The Led Matrix(MAX7219) application also has several different aspects. Other program chunks are similar to our previous implementations.
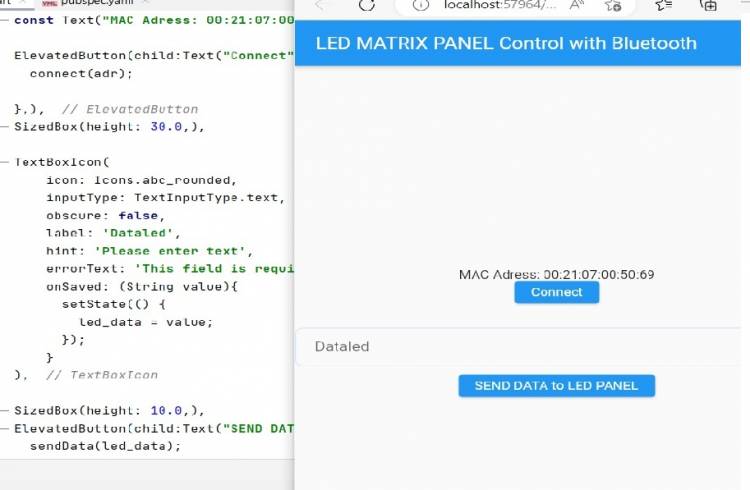
One of the differences in this implementation is that we use a textBox for data entry. Since we have to send data to the led matrix, there must be an object that we need to enter data. In the State part of our Flutter application, we created a String variable to hold the value entered in the texbox object. String led_data; We load the value entered in SetState to this variable that we created with the line.
We need to add the following line to the top of the Flutter code screen:
import 'package:flutter_text_box/flutter_text_box.dart';
Also, we need to make the following changes in the pubspec.yaml file and click on the pubGet link:
dependencies:

   flutter:

     sdk: flutter

   flutter_bluetooth_serial: ^0.4.0

   flutter_text_box: ^0.0.1
In order to use the commands and functions related to Bluetooth, we need to add the following line to the top of the code screen:
import 'package:flutter_bluetooth_serial/flutter_bluetooth_serial.dart';
We use the same connect() and sendData() functions that we used in our previous bluetooth control applications. The value entered in the textbox object is assigned to the led_data variable, and then we send the value in this variable to the bluetooth adapter as follows:
sendData(led_data);
That's all for now about the Flutter-dart coding part of the app.
Below are the Flutter-Dart codes for the basic application.
import 'dart:async';
//import 'dart:convert';

import 'package:flutter/foundation.dart';
import 'package:flutter/material.dart';
import 'package:flutter_bluetooth_serial/flutter_bluetooth_serial.dart';
import 'package:flutter_text_box/flutter_text_box.dart';

void main() => runApp(const MyApp());

class MyApp extends StatefulWidget {
  const MyApp({super.key});

  @override
  // ignore: library_private_types_in_public_api
  _MyAppState createState() => _MyAppState();
}

class _MyAppState extends State<MyApp> {
  List<BluetoothDevice> _devices = [];
  late BluetoothConnection connection;
  String adr="00:21:07:00:50:69"; // my bluetooth device MAC Adres
  String led_data="blank"; // ----->>>>>>>>>>lex matrix

  @override
  void initState() {
    super.initState();
    _loadDevices();
  }

  Future<void> _loadDevices() async {
    List<BluetoothDevice> devices = await FlutterBluetoothSerial.instance.getBondedDevices();

    setState(() {   _devices = devices;    });
  }
//----------------------------
  Future<void> sendData(String data)  async {

    data = data.trim();
    try {
      List<int> list = data.codeUnits;
      Uint8List bytes = Uint8List.fromList(list);
      connection.output.add(bytes);
      await connection.output.allSent;
      if (kDebugMode) {
        // print('Data sent successfully');
      }
    } catch (e) {
      //print(e.toString());
    }
  }

  @override
  Widget build(BuildContext context) {
    return MaterialApp(
        home: Scaffold(
          appBar: AppBar(
            title: const Text(" LED MATRIX PANEL Control with Bluetooth"),
          ),
          body: Center(
            child: Column(
              mainAxisAlignment: MainAxisAlignment.center,
              children: [
                const Text("MAC Adress: 00:21:07:00:50:69"),

                ElevatedButton(child:Text("Connect"),onPressed: () {
                  connect(adr);

                },),
                SizedBox(height: 30.0,),

                TextBoxIcon(
                    icon: Icons.abc_rounded,
                    inputType: TextInputType.text,
                    obscure: false,
                    label: 'Dataled',
                    hint: 'Please enter text',
                    errorText: 'This field is requiered !',
                    onSaved: (String value){
                      setState(() {
                        led_data = value;
                      });
                    }
                ),

                SizedBox(height: 10.0,),
                ElevatedButton(child:Text("SEND DATA to LED PANEL"),onPressed: () {
                  sendData(led_data);

                },),
              ],
            ),
          ),


        )

    );
  }

  Future connect(String address) async {
    try {
      connection = await BluetoothConnection.toAddress(address);
      //sendData('111');
      //durum="Connected to the device";
      connection.input!.listen((Uint8List data) {
        //Data entry point
        // durum=ascii.decode(data);
      });


    } catch (exception) {
      // durum="Cannot connect, exception occured";
    }
  }

// --------------**************data gonder
//Future send(Uint8List data) async {
//connection.output.add(data);
//await connection.output.allSent;
}
//------------*********** data gonder end
