GY-NEO6MV2 GPS Module Review
In this article, we will examine a GPS module for use in tracking systems, which is very easy to connect with microcontrollers.
This GPS module is also quite small in size. Its use with microcontroller cards, which are small in size, also provides advantages in terms of mounting and lightness in our tracking systems. It is very easy to connect and program with boards such as Raspberry Pi Pico or Arduino Nano.
After understanding the connections, the second issue we need to understand is how the data coming from the satellites to the GPS module is structured. GPS data from satellites is in NMEA format. The NMEA format is an ASCII-based format. This format is as follows:
We will examine the parsing of these codes with Arduino commands below.
Now, let's examine the module...
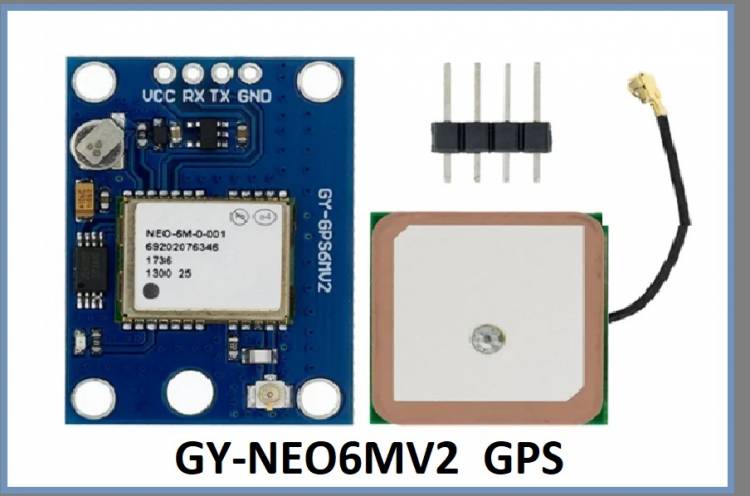
GY-NEO6MV2 is a GPS receiver module based on the NEO-6M GPS module. This module is used to receive location data and connect to the GPS satellite system. Some basics about the GY-NEO6MV2:
GPS Function: The GY-NEO6MV2 is designed to access the GPS satellite system (Global Positioning System). It receives signals from the GPS satellite system and extracts location, speed, altitude and other navigation data from these signals.
NEO-6M GPS Module: GY-NEO6MV2 is based on u-blox's NEO-6M GPS module. NEO-6M is a high sensitivity and reliable GPS receiver and can be connected to devices such as microcontrollers or computers via serial communication protocol (UART).
Features: Some features of the GY-NEO6MV2 are:
GPS receiver over 50 channels
Provides location data with an accuracy of 2.5 meters
5 Hz refresh rate (5 location data updates per second)
Serial data output at TTL level
Stores configuration data with internal EEPROM memory
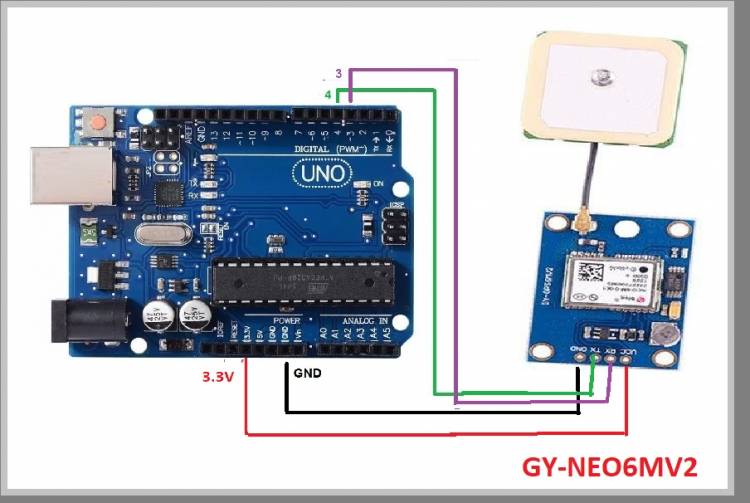
Connection and Usage: The GY-NEO6MV2 can be connected to a device such as a microcontroller or a computer. The module needs a power supply to power the VCC and GND pins and uses the RX and TX pins to output serial data. The module also requires an antenna connection.
Programming and Libraries: To use the GY-NEO6MV2, you may need to use an appropriate programming language and GPS libraries on the device it is connected to. For example, in Arduino-based projects, GPS data can be accessed with an appropriate GPS library using the Arduino IDE.
Below are sample Arduino codes. The project schema is in the article picture.
#include <SoftwareSerial.h>
SoftwareSerial gpsSerial(4, 3); // RX, TX pins
void setup() {

   Serial.begin(9600); // Serial communication speed

   gpsSerial.begin(9600); // baud rate of the GPS module

}
void loop() {

   while (gpsSerial.available()) {

     char data = gpsSerial.read();

     if (data == '$') { // NMEA sentence start check

       String sentence = gpsSerial.readStringUntil('\r');

       if (sentence.startsWith("$GPRMC")) { // Take only the GPRMC clause as an example

         parseGPRMC(sentence);

       }

     }

   }

}
void parseGPRMC(String sentence) {

   // Parsing the GPRMC clause

   // Take only latitude and longitude values as an example

   int comma1 = sentence.indexOf(',');

   int comma2 = sentence.indexOf(',', comma1 + 1);

   int comma3 = sentence.indexOf(',', comma2 + 1);

   int comma4 = sentence.indexOf(',', comma3 + 1);

   int comma5 = sentence.indexOf(',', comma4 + 1);

   int comma6 = sentence.indexOf(',', comma5 + 1);


   String latitude = sentence.substring(comma3 + 1, comma4);

   String longitude = sentence.substring(comma5 + 1, comma6);
   Serial.print("Latitude: ");

   Serial.println(latitude);

   Serial.print("Longitude: ");

   Serial.println(longitude);

}
This code parses the GPS data, only considers the "$GPRMC" clause and extracts the latitude and longitude values from this sentence. The parseGPRMC() function parses the GPRMC sentence and displays the obtained latitude and longitude values on the Serial Monitor.
The parsed latitude and longitude information can be transferred to other components that we will add to our project. For example, it can be sent as information to a mobile phone with the help of a GSM module. Or, if a Wifi module is connected to our microcontroller system, it can be sent to an IoT Cloud over the Internet connection and tracked with the help of Google Maps object.